 Cycling in winter
As winter sets in, many cyclists, sighing heavily,
prepare their bikes for winter storage
. Daily commutes to and from work are postponed until spring, leaving ahead the unpleasant prospect of relying on public transportation.
However, some cyclists aren’t fazed by winter—it doesn’t mean separation from their beloved bicycles.
In fact, there’s a certain category of cycling enthusiasts who eagerly await the cold season. Apart from the opportunities for extreme riding, new routes open up for cycling trips—frozen water surfaces or once-impassable muddy forest trails.
So why not keep your two-wheeled companion active through the winter? This is entirely possible if you properly prepare your bike for winter conditions.
How to Choose a Mountain Bike So, sooner or later, every cyclist desires to experience an extreme mountain descent—mountain biking. Learn how to choose a mountain bike on our website.
Motorcyclists, on the other hand, might find this article on types of motorcycle helmets and what to consider when buying one particularly helpful.
“Changing Tires” for Winter Cycling
 Winter tires for bicycles
If summer city biking often calls for
slick bicycle tires
, then you must forget about them when it comes to winter—they are absolutely unsuitable for safe riding.
Switching your bike to winter tires is the primary condition for transforming it into an all-season machine. It’s nearly identical to switching a car to winter tires.
So what’s the difference between winter tires and regular ones, and how should you choose them?
As a rule, winter tires for bicycles aren’t purely rubber because such material has a negative tendency to “harden” in extreme cold. When choosing tires that aren’t studded, you should look for markings like “Winter” or simply “W”—these tires are made of compound material, which maintains its elastic properties regardless of the temperature.
What type of tire and tread pattern is most suitable? It all depends on the expected conditions of bike usage.
If you plan to follow regular routes and daily commutes to and from work in large cities, then cross semi-slick tires will likely suffice.
City streets are typically cleared of snow promptly, and road surfaces rarely become icy—the emissions from numerous automobiles warm them up. A moderately aggressive tread pattern offers confidence on wet asphalt or freshly fallen shallow snow, while maintaining excellent speed and maneuverability.For cyclists planning winter rides in countryside settings, where dense or loose snow predominates and sections polished to icy smoothness are unlikely, it’s better to choose mud tires. These tires have high, widely spaced knobs, ensuring that the wheels won’t get clogged with snow while providing excellent traction and contact with the surface.
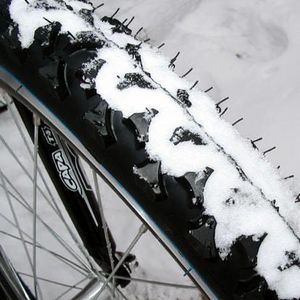
For many fans of cycling, such “mild” conditions aren’t enough—they prefer to bike through snow, ice, and even over frozen lakes or rivers. In that case, studded bicycle tires are indispensable. For the most extreme rides, you’ll need tires with an aggressive tread pattern like mud tires but equipped with four rows of metal studs, usually ranging from 240 to 360 studs.
There are also winter tires suitable for city conditions if the roads in your area are often covered with compacted snow or ice. These tires resemble cross semi-slicks in tread pattern, but they come equipped with 100–200 studs arranged in two rows.
A quick note on stud shapes, as they can vary. There are pointed tips, slightly rounded ones, and even almost flat shapes. If most of your ride occurs on asphalt streets, overly protruding sharp studs won’t provide stability, and the studs themselves will wear out quickly. Do not forget that any studded tires require a specific break-in period of 50–100 km with slightly reduced tire pressure. During this time, the driving speed should not be high — up to 15 km/h — and one should avoid sudden braking or hitting obstacles. Ideally, after this initial period, the tires should be swapped to different positions. This ensures a complete break-in process, and all speed and road restrictions will be lifted.
E-bike conversion kit To enable any cyclist to equip their bike with an electric motor, manufacturers produce many different e-bike conversion kits . Our guide will help you navigate all the options with ease.
Tips for beginner skateboarders are available here . Learn how to buy your first skateboard and ride it.
“Handmade”
 DIY winter tires for a bike
High-quality winter bike tires can be quite expensive, so resourceful enthusiasts often modify summer “knobby” tires themselves:
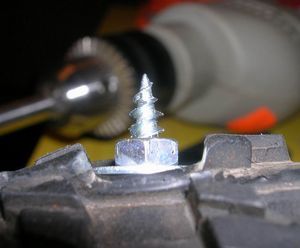
As the main component in this case, self-tapping screws with a 4.2 mm diameter and a 13 mm length, featuring a washer, are commonly used.
After carefully marking the crests of the tread, the screws are inserted from the inside using good adhesive (e.g., “88”).
Next, an old inner tube is glued inside the tire as a liner, the wheel is reassembled, inflated to maximum pressure, and left for one or two days.
Sharp screw ends protruding too much can be ground down so that they extend just 2–3 mm beyond the surface of the rubber tread.
That’s it — you’re ready to tackle winter trails!
To be fair, this DIY method for converting tires into winter ones, while having its share of fans, is often criticized by professionals.
No matter how hard you try, it is almost impossible to replicate the precise stud alignment that top manufacturers use in their designs when working at home.
Before concluding the tire topic, here are a few additional important points.
In winter conditions, it’s essential to carefully monitor tire pressure—pressure should be lower than in summer. Overinflated tires won’t provide the necessary grip on icy roads. However, under-inflating them too much can lead to rapid tire wear.
Pay close attention when installing the wheel to the direction of rotation. The tread pattern and stud placement are optimized for proper rotation. A mistake that might be forgivable in summer can result in unpredictable bike behavior on slippery winter roads.
Getting your bike ready for winter
 Winter bike
Simply equipping your bike with winter tires doesn’t make it fully prepared for winter use. There are several other important considerations:
In cold, snowy, and icy conditions, the effectiveness of rim brakes decreases dramatically — brake pads tend to slip on an icy rim. A winter bike must be outfitted with disc brakes.
If your bike has elastomer-based suspension, be aware that it will perform poorly in winter. Rubber or latex suspension components harden in cold temperatures, turning a hardtail into a rigid frame. Air or hydraulic suspension should retain its functionality, but it’s essential to cover them with good dust seals.
In winter, road visibility worsens significantly. This is due to shorter daylight hours, snowfall, and car windows often being frosted, fogged, or dirty. For your safety, consider installing additional front and rear lights and reflectors on your bike. Wearing brightly colored clothing with reflective elements is also a good idea.
Despite all preparations, the risk of falling in winter increases significantly. This means that protective gear such as a helmet, gloves, and joint guards for hands and legs becomes an essential part of your winter cycling kit.
Learning tricks on a bike Want to learn bike tricks ? Start with the “wheelie” — the art of riding on the rear wheel — and impress your friends.
Don’t miss this story about autogyros. Do you know what they are?
Challenges of Winter Cycling
 Winter bike riding
In winter, the negative external effects on bike parts and components increase significantly. Temperature fluctuations, high humidity, and road chemicals all contribute to their rapid wear and tear.
It is not recommended to store a bicycle in an overly warm room. When transitioning to frost or returning indoors, thermal expansion of materials damages the paint and lacquer coating, leading to rapid metal corrosion, exacerbated by salt or other components of road chemicals. This is especially true for models with steel frames, which require constant monitoring, thorough cleaning of dirt and rust spots, and timely touch-ups with paint.
When riding on snow or melted slush, the chain and gear shifters quickly get clogged. After each winter ride, it is necessary to thoroughly clean them and lubricate if needed.
Don’t forget about the cables—they can also get clogged with dirt. Additionally, the lubricant inside them may thicken in the cold, which should be taken into account when braking or shifting gears.
It is not uncommon for low temperatures to stiffen the seals on hubs, allowing dirt and moisture to get inside. Without regular disassembly, cleaning, and lubrication of this component, the bearings can fail very quickly.
In short, winter cycling requires not only thorough preparation for the cold season but also increased attention to your bicycle during operation. Only by adhering to these conditions can you successfully ride through this not-so-favorable time of the year.


